Cigarette Free at Last!!

Thursday, August 10, 2017
It's been 4 YEARS!...
I quit smoking after 40 years by vaping...I haven't had nicotine for over 2 years and 4 years ago today, I had my last cigarette... ❤

Tuesday, May 2, 2017
New fun project... :)
Just finished this mini tissue holder... :)


Still need to add the ribbon and flowers to this one... :)

 All done!


Still need to add the ribbon and flowers to this one... :)


Monday, April 17, 2017
My new "lemonade"...WOW!
WOW! I ran across something this weekend that is amazing! I had never heard of barley water, but OMGosh! It is so good! It's really easy to make and is supposed to be really good for you, too! It's my new lemonade! I just made a batch and poured it over ice and boy is it good!
It's supposed to have a lot of health benefits, too:
Barely Water Benefits and Recipe
(there's a different recipe on this link)
Here's the recipe I used:
Barley Water Recipe

It's supposed to have a lot of health benefits, too:
Barely Water Benefits and Recipe
(there's a different recipe on this link)
Here's the recipe I used:
Barley Water Recipe
- 1⁄2cup pearl barley
- water
- 10cups water,
extra
- 1lemon, rind of,
grated
- 1cup lemon juice (or other juice of choice)
- 1cup sugar (or other sweetener of choice)
Directions
1. Rinse the barley well.
2. Cover barley in a pot with cold water &
bring to the boil, drain.
3. Return barley to saucepan with the lemon rind
& 10 cups water, cook slowly for 1 hour.
4. Add the lemon juice & sugar and stir until
sugar has dissolved.
5. Strain and chill to serve.
6. Discarded barley can be mixed with some dried
fruit & nuts and warm milk and makes a great breakfast.

Saturday, April 15, 2017
What are you up to today?
Me? I'm dog sitting and making myself useful...rainbow loom crochet hook handles... :)


Here's the video I used:
Wednesday, April 12, 2017

Monday, April 10, 2017
FOUND the Book!
Remember I said I was going to see if I could find the food list for a program called Eat More, Move More, Lose More? Well, I found it! I bought it and it arrived today. I looked through it and sure enough, it's the same book! Here's a link:
Healthy Vegetarian Lacto Ovo Recipes!
Look what I found! I did a search for some recipe ideas and found some yummy looking recipes for Lacto-Ovo Vegetarians. Go check it out! I think you'll be pleasantly surprised!
What 25 extra pounds looks like...
Good morning,
Been thinking a lot about this blog and what I need to or should be writing about for you. Then I realized, I never showed you what 25+ extra pounds looks like on a 5'2", small framed body. I also felt like by NOT showing you, it didn't give me much credibility. So, I'll show you what 25+ extra pounds look like on me. I've gone from weighing 105-110 pounds and wearing a size 0/1 to a size 6/8. I have cellulite and flabby arms and I'm quite uncomfortable. I've always been small, so this is difficult for me. I know gaining unwanted weight is hard for anyone, so no judging!
So, I'm going to show you my before and after weight gain. Hopefully, when I'm done with my journey, I'll be back to my before in a few months. So... here you go. I'm wearing clothes, because trust me! NO one wants to see this is a bikini! ;)
Before I got sick, 105#, size 0:


After I was treated with medication for Grave's Disease, 133#, size 6/8:


(these two photos were taken today)
Sunday, April 9, 2017
Thank you and Remember!!
Hey Everyone!
Thanks for keeping up with my blog! Remember to follow me, on the right there, so you'll get new updates. And please share with all of your friends! I'd love to know your thoughts, so please comment and give me some suggestions on content you'd like to see. :)

How about some homemade coffee creamers? :)
Good morning!! 
Anyone else tired of spending a fortune on flavored liquid coffee creamers?...I sure am...SO!...I made my own...I tweaked the recipes because I wanted them to LAST LONGER, SO I MADE LIQUID NON-DAIRY CREAMER INSTEAD OF MILK to make my base recipe (they'll last longer, because they're not made with milk) and because I thought they were TOO sweet...you can use the low-fat or fat-free sweetened condensed milk, but I used regular (it can last 2-3 weeks once opened, but I doubt your creamer will last that long! LOL)...I also added a few shakes of salt from the shaker to cut the sweetness and act as a preservative...I saved my empty name-brand creamer containers, so I didn't even have to tear off the labels or even relabel them (but it's not an endorsement of any product over another. They are large enough to hold the amount I made.)...because they're warm, I'm leaving the tops open just a little until they're completely cool...so here you go! :)
I use a large mixing bowl with a spout and handle you can get at the dollar store for most of my liquid recipes. Makes it easier to pour into funnels or jars.
**REMEMBER! You can put salt in, but you can't take it out. So go easy on the salt!!
To begin, I made 5 cups of liquid creamer from powdered:
5 cups of water, heated in the microwave until hot (about 2 1/2 minutes), you can boil the water if you'd like, but let it cool until it's warm.
2 1/2 cups of plain powdered creamer (which ever kind you normally use)
Slowly add the creamer to the heated water, mix with a wire whisk or slotted spoon until no clumps remain. Set aside.
Caramel Macciato Creamer
(original recipe is here: http://www.shugarysweets.com/2014/07/
Ingredients
1 1/2 cup milk
1 tsp espresso powder
14oz sweetened condensed milk
1/3 cup caramel sauce
2 tsp vanilla extract
Instructions
In a quart size mason jar, combine 1/2 cup of the milk with the espresso powder. Microwave for 30 seconds. Whisk smooth, and heat an additional 30 seconds. Add remaining milk, sweetened condensed milk, caramel sauce and vanilla. Screw top on mason jar and shake vigorously until combined.
Store in refrigerator.
Notes
**Use fat free milk and fat free sweetened condensed milk to cut some of the fat.
**I use caramel ice cream topping.
**To determine how long this will last, go by the date on your milk.
These are my changes to the recipe:
1) I used my liquid creamer instead of milk.
2) I didn't have espresso powder, so I used a HEAPING teaspoon of instant coffee. (I buy the store brand, so it's usually stronger for some reason.) You can use decaf if you wanted to, I don't think it matters, we're going for "taste" here.
3) I added a few "shakes" of salt from the shaker and stirred.
4) It was WAY too sweet in my opinion, since I add sugar to my coffee anyway. So, I added another cup of my liquid creamer. At that point, it was still a bit sweet, so I added another shake of salt. Tasted really good to me, so I poured it into my empty bottle, shook it well, then left the top open a bit and put in the fridge. DONE!
Chocolate Caramel Creamer (pictured)
(Original recipes are here, there wasn't one for what I wanted to make, so I improvised! TONS of flavors here: http://www.mrshappyhomemaker.com/
 Base recipe:
14oz sweetened condensed milk
1 3/4 cup milk or cream (whole, lowfat, skim, almond, soy, heavy cream, half & half etc – whatever your preference, however the more fat, the more creaminess)
Mix the ingredients together well. I like to add them to a mason jar and shake it like crazy. You could also opt to use an old (washed) creamer container. Refer to the directions & tips at the very end of the post as well.
1) I used my liquid creamer instead of milk.
2) I used 1/4 cup of caramel topping and 1/4 cup of chocolate syrup. You can use sugar-free versions if you'd like. I don't think it matters, we're going for "taste" here, so you can add more or less to your liking of either one. I added another squirt of chocolate after tasting the finished product. ;)
3) I added a few "shakes" of salt from the shaker and stirred.
4) It was WAY too sweet in my opinion, since I add sugar to my coffee anyway. So, I added another cup of my liquid creamer. At that point, it was still a bit sweet, so I added another shake of salt. Tasted really good to me, so I poured it into my empty bottle, shook it well, then left the top open a bit and put in the fridge. DONE!
This recipe made a little more than my container holds, so I put the extra in a jelly jar and put the lid on loosely and into the fridge till cold.

Anyone else tired of spending a fortune on flavored liquid coffee creamers?...I sure am...SO!...I made my own...I tweaked the recipes because I wanted them to LAST LONGER, SO I MADE LIQUID NON-DAIRY CREAMER INSTEAD OF MILK to make my base recipe (they'll last longer, because they're not made with milk) and because I thought they were TOO sweet...you can use the low-fat or fat-free sweetened condensed milk, but I used regular (it can last 2-3 weeks once opened, but I doubt your creamer will last that long! LOL)...I also added a few shakes of salt from the shaker to cut the sweetness and act as a preservative...I saved my empty name-brand creamer containers, so I didn't even have to tear off the labels or even relabel them (but it's not an endorsement of any product over another. They are large enough to hold the amount I made.)...because they're warm, I'm leaving the tops open just a little until they're completely cool...so here you go! :)
I use a large mixing bowl with a spout and handle you can get at the dollar store for most of my liquid recipes. Makes it easier to pour into funnels or jars.
**REMEMBER! You can put salt in, but you can't take it out. So go easy on the salt!!
To begin, I made 5 cups of liquid creamer from powdered:
5 cups of water, heated in the microwave until hot (about 2 1/2 minutes), you can boil the water if you'd like, but let it cool until it's warm.
2 1/2 cups of plain powdered creamer (which ever kind you normally use)
Slowly add the creamer to the heated water, mix with a wire whisk or slotted spoon until no clumps remain. Set aside.
Caramel Macciato Creamer
(original recipe is here: http://www.shugarysweets.com/2014/07/
Ingredients
1 1/2 cup milk
1 tsp espresso powder
14oz sweetened condensed milk
1/3 cup caramel sauce
2 tsp vanilla extract
Instructions
In a quart size mason jar, combine 1/2 cup of the milk with the espresso powder. Microwave for 30 seconds. Whisk smooth, and heat an additional 30 seconds. Add remaining milk, sweetened condensed milk, caramel sauce and vanilla. Screw top on mason jar and shake vigorously until combined.
Store in refrigerator.
Notes
**Use fat free milk and fat free sweetened condensed milk to cut some of the fat.
**I use caramel ice cream topping.
**To determine how long this will last, go by the date on your milk.
These are my changes to the recipe:
1) I used my liquid creamer instead of milk.
2) I didn't have espresso powder, so I used a HEAPING teaspoon of instant coffee. (I buy the store brand, so it's usually stronger for some reason.) You can use decaf if you wanted to, I don't think it matters, we're going for "taste" here.
3) I added a few "shakes" of salt from the shaker and stirred.
4) It was WAY too sweet in my opinion, since I add sugar to my coffee anyway. So, I added another cup of my liquid creamer. At that point, it was still a bit sweet, so I added another shake of salt. Tasted really good to me, so I poured it into my empty bottle, shook it well, then left the top open a bit and put in the fridge. DONE!
Chocolate Caramel Creamer (pictured)
(Original recipes are here, there wasn't one for what I wanted to make, so I improvised! TONS of flavors here: http://www.mrshappyhomemaker.com/

14oz sweetened condensed milk
1 3/4 cup milk or cream (whole, lowfat, skim, almond, soy, heavy cream, half & half etc – whatever your preference, however the more fat, the more creaminess)
Mix the ingredients together well. I like to add them to a mason jar and shake it like crazy. You could also opt to use an old (washed) creamer container. Refer to the directions & tips at the very end of the post as well.
1) I used my liquid creamer instead of milk.
2) I used 1/4 cup of caramel topping and 1/4 cup of chocolate syrup. You can use sugar-free versions if you'd like. I don't think it matters, we're going for "taste" here, so you can add more or less to your liking of either one. I added another squirt of chocolate after tasting the finished product. ;)
3) I added a few "shakes" of salt from the shaker and stirred.
4) It was WAY too sweet in my opinion, since I add sugar to my coffee anyway. So, I added another cup of my liquid creamer. At that point, it was still a bit sweet, so I added another shake of salt. Tasted really good to me, so I poured it into my empty bottle, shook it well, then left the top open a bit and put in the fridge. DONE!
This recipe made a little more than my container holds, so I put the extra in a jelly jar and put the lid on loosely and into the fridge till cold.
Enjoy!

Saturday, April 8, 2017
Adventures in (not) Cooking... :)
Adventures in (not) cooking is all about making yummy treats without having to cook!
There are all sorts of things you can make without having to heat up the house with the oven on all day or even slaving over a hot stove. Here are a few things I've made without cooking or baking.
First off, let's be clear about one thing:
Chocolate is a vegetable...That's my story and I'm sticking to it! 😉

That said...let's get started.
Here are some things that are easy to make and use at home that are very expensive to buy, but easy to make and you can gift them, too. Vanilla beans can be used many times, just refill with vodka or sugar to make more extract or vanilla sugar. I
put a bean, cut in half and sliced down the middle (not all the way
through) in each bottle, so when it's empty, it can be refilled and
started again by the recipients...I'll give them a shake every few
days. (You can make orange extract, too.)


I did the same for vanilla sugar. Just give it a shake every few days. When your jar is empty or low, just refill and start again. :)

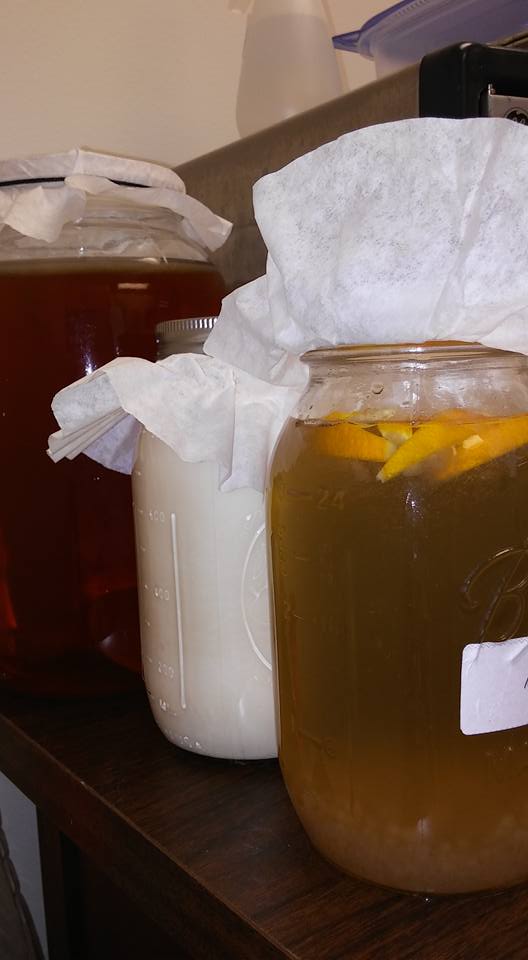
Orange kefir water, milk kefir and Kombucha tea...the tea has a new scoby, too! You can make the kefir water and tea fizzy, if you'd like with a second bottling and added flavors. I really liked ginger kefir water. I've added peach nectar to milk kefir and blended blueberries, too. YUMMY!
Technically, you don't cook when making yogurt. I carefully heat my milk in the microwave and my short cut is UHT milk in the box. Opinions differ, but I've never had any issues with my yogurt setting properly using it. I use pie filling to make fruit on the bottom. I also add vanilla and instant coffee and a dab of sweetener to make coffee flavored yogurt, too. There are so many ways to make it, I found a brand new unit for $10 on eBay, and one at Goodwill for $5 that was used, but works great! Even brand new at full price, it's worth the money. Some suggest you shouldn't make it with fruit on the bottom, but rather add it later. I've done it both ways with no problems.


You can make butter using your food processor. It's a little labor intensive, but worth the outcome. I used sea salt to preserve mine. I keep it in a butter bell so it stays spreadable. If you don't use a preservative (like salt), it will go bad, so I don't recommend it.

You can make fudge in the microwave. Easy stuff! Two bags of chocolate chips (your choice) 1 cup of nuts (optional) 1 can sweetened condensed milk...microwave 30 seconds at a time, stir, then repeat until smooth and creamy...pour into 8×8 pan (I always use a jellyroll pan, more fudge, thinner pieces)...let cool completely before cutting...store in airtight container...I top mine with chips or nuts too...I've used peanut butter chips and Andes candy mint chips too...I do one bag chocolate to one bag flavored...

You can make sour cream and cream cheese, too. Like yogurt, the hardest part is waiting. I used sea salt as my preservative in these, as well. The recipes I use from Cultures for Health, make about a quart of each. I noticed they stay fresher, longer than the story bought stuff.


If you don't count melting chocolate in a chocolate pot as "cooking", you can make candy too... :)


And of course, we talked previously about refrigerator teas and cold brew coffees. You can make half and half by adding half lemonade to your tea and cut back on the water. :)


What kinds of adventures in NOT cooking have you had? Or what would you like to see me try? Let me know in the comments and be sure to follow my Blog. :)
Hit a new milestone today... :)
Good morning!
I hit a new milestone today on Twitter! I hit 900 Followers for my @lilrdvet2 profile. I have a business profile too, but don't use it much. I'm hoping one day, I'll be able to build my blog followers to that level! ♥

I hit a new milestone today on Twitter! I hit 900 Followers for my @lilrdvet2 profile. I have a business profile too, but don't use it much. I'm hoping one day, I'll be able to build my blog followers to that level! ♥

Finally got it done! :)
Just finished the owl teapot cozy that matches my French Press...I've been procrastinating...but finally got it made. :)


Wednesday, April 5, 2017
Bees for beehive cozy came in today!
The bees finally came for the knitted beehive teapot cozy! I looked everywhere for bees! I thought maybe I could find some cute (and cheap) earrings with rhinestones. And I did! :)


New project is complete...
Just finished this cute teapot cozy! I've always wanted to make this since I saw it a few years ago...I learned a few new techniques while making this, too... :)


Subscribe to:
Posts (Atom)