
Cigarette Free at Last!!

Tuesday, July 31, 2012


Monday, July 30, 2012
Bet you didn't know...
Bet you didn't know you can make an emergency candle out of vegetable shortening! Well you can! And it will burn for a really long time! Just like any other candle, I don't recommend leaving it unattended!
INSTRUCTIONS
1) Open a can of Crisco. The bigger the can, the better.
2) Insert the candle wick into the center of the can of Crisco. If the can has a large diameter, multiple wicks can be inserted. Leave a quarter of an inch of wick showing above the Crisco to make sure the flame is a manageable size.

INSTRUCTIONS
1) Open a can of Crisco. The bigger the can, the better.
2) Insert the candle wick into the center of the can of Crisco. If the can has a large diameter, multiple wicks can be inserted. Leave a quarter of an inch of wick showing above the Crisco to make sure the flame is a manageable size.
3) Even out the top of the Crisco so the candle is smooth.
4) Light the wick and enjoy the candle.
Bet you could make a few of these using the small cans too! Then you could have one in every room you were in!

Anyone love those fire pits? Look what I found!
Love those firepits? How about a "personal" sized one? I found this over on theartofdoingstuff.com! How cool is this?! I think this would be a nice addition to a backyard hideaway! Or even inside if you don't have a fireplace! It would make a great conversation piece for a party! I don't have space inside, but can think of a great place to put it out back! Found it here: http://www.theartofdoingstuff.com/how-to-make-a-personal-fire-pit-for-cheap/

Please take note of the warnings she posts and make sure you used it in a safe location! Enjoy!

Please take note of the warnings she posts and make sure you used it in a safe location! Enjoy!
Sunday, July 29, 2012
Cake Decorating and Baking tips!
Cake Baking/Decorating tips
The best cakes start with using the right tools for the job. Making nice cakes takes practice and some imagination. When I got tired of getting bad cakes from the bakery for my children's birthdays, I decided to learn how to do it myself if it killed me...it didn't! LOL Just remember, once you start making pretty cakes, everyone will want you to make them...I made a pretty good little side income making birthday and special occasion cakes for friends and others...my business was called Edible Art...I took a class and read a lot of books and took the best tips and methods and used them for all of my cakes...I'll share them with you now...
First things first:
Ok, so the first thing we have to do is start with the basics. I don't grease and flour my cake pans, it leaves a film or makes the cakes crumby, which gets into your frosting. Crumbs can ruin a pretty cake. I use the spray with flour added, Baker's Secret (or the store brand is fine) or just plain old Pam. If I'm out and have to grease and flour my pans, I take the pans to the sink and turn them upside down and knock out the extra flour for good measure. The pans are easier to clean this way, too.
Pour your cake batter into your pans evenly, then shake side to side, back and forth to even it out. Then, pick up the pan and drop it a few times on the counter/table top to remove any large air bubbles. You don't want any air bubbles to ruin you cake when you cut it.
Wrap your pans with your strips, so it bakes evenly (see note below) and place in the center of the oven.
Set the timer for the shortest time first, do not open the oven to check the cake until the timer goes off the first time. Use a toothpick and stick it in the center, if it comes out clean, it's done. If it doesn't, set the timer for 1-2 more minutes, until it does. When it's done, remove the cake strips, be careful, the pin will be hot. I set my cakes on a cooling rack for at least 10 minutes before turning it out on my cake board/plate. Run a butter knife around the edges to make sure it's loosened from the pan. Place the cake board or plate evenly over the cake, and turn it over and set on the counter or table. Gently pat the cake pan to make sure the cake has come loose from the pan. Gently remove the pan, if the cake is still not loose, let it sit for a moment and pat again, it should come out clean. Allow the cake to cool completely before frosting and decorating.
If you're in a hurry, after you put it on a board or plate, you can put the cake in the freezer for 10-20 minutes. Place your hand on the center of the cake, if it's still warm, leave for a few more minutes. If you forget it and it freezes, allow to thaw before frosting or the frosting can fall away from the cake and ruin a beautiful cake...I've seen this happen, it wasn't funny when the customer was due to arrive any moment for her wedding cake (I learned from someone else's mistake!)
Ever taken a cake out of the oven and it has a big hump in the middle?...well, not anymore!
The reason the cakes hump when they bake, is because the sides cook faster than the middle. Here's how you solve that problem: You know those old towels you've been promising to throw away or use for rags?...Don't!...Take them and cut them into strips, the width of your cake pans, long and short ones. Get some big safety pins to keep with the strips in a storage box or drawer.
While you are mixing your batter, (I use boxed mix, it works just fine and everyone thinks they're made from scratch, they never fail me. I also never claim anything but my frosting is homemade) place the strips in a glass or cup of water. After you have your cake ready to go in the oven, take the strips and squeeze them out hard. Wrap them around your cake pan and pin in place. The wet strips keep the outside of the pan from heating faster than the center and your cakes come out level. Leave the pins on after the first use, so all you have to do the next time is wet it and slip it on the pan.
If you don't want to do this, or forget and your cake humps, simply take a knife wider than the pan and lay it flat across the pan and "saw" the hump off the cake and set aside (good snack while decorating if the kids don't get it first! LOL)
Remove crumbs before frosting:
After the cake has cooled completely, take the cake to the sink and gently brush off the crumbs from the top and sides of the cake. This is where most crumbs in the frosting come from to begin with, that and not using the proper technique when frosting the cake. Rinse the crumbs down the sink, no mess! Now you're ready to frost the cake!
Proper method of frosting a cake:
Place several spoonfuls of frosting in the center top of the cake. Use a large angled spatula for the top and a large flat metal spatula for the sides of a two layer, a small metal spatula for a single layer. I use these, you can find them at WM or a craft store:
http://www.wilton.com/store/site/
http://www.wilton.com/store/site/
http://www.wilton.com/store/site/product.cfm?id=3E30E747-475A-BAC0-52128628832B4224
Remember, you need the right tools to do a great job...now, using your large angled spatula, push the frosting, evenly to the edges of the cake. Do not pull the spatula back toward you, as you will pick up crumbs. Lift the spatula up and away from the cake as you work different areas. Just keep turning the cake until you have the top covered evenly.
Now, use the large flat spatula for a two layer cake or the small flat spatula for a single layer cake. Pick up the frosting from the bowl (about a tablespoon for single layers, the width of the cake for two layers*) and begin to smooth the frosting on the sides of the cake, starting away from you and pushing the frosting toward you. I'm right handed, so I begin on the left side of the cake and turn the cake to the left as I work around the cake, (work the opposite direction if you are left handed). Lift the spatula back and away from you when you need more frosting so it doesn't lift the frosting and pick up crumbs. Keep working until the cake is covered.
Now, go back and use your spatula to smooth out any line or bumps in the frosting. Then, get a tall glass/cup, fill with hot tap water. Wipe your spatula clean with a paper towel, then dip in the hot water and use to smooth the cake evenly. Wipe the blade after dipping and before dipping so you don't get the frosting wet, or put frosting in the water. Work quickly. Now, allow the frosting to dry and crust so you can place your design/pattern on the cake for decorating.
*For two layer cakes, make sure the middle frosting layer is even, as it will make your cake lopsided if you don't.
Designs on the sides of the cake:
You can leave the cake smooth or you can use a cake rake to make lines on the side (be gentle, or the cake will show through), or allow the frosting to dry and take a paper towel with the bumps on it and gently rub it on the sides for a neat little pattern.
How to make a pattern out of just about any picture:
Take the picture you want to use, I find them in coloring books, greeting cards, children's books and even video game covers...I've used comic book covers too...ask the person if they have a picture of what they want...make a copy of it on a copy machine, enlarge it or shrink it to fit your cake. Be sure to leave room to write your message. I've always made the message match the picture, for instance: an Air Jordan cake would say "Hope you Air Jordan your Birthday"...or when I used the Magic basketball logo is said, using the logo for the word: "Just like "Magic" Ian turned 10"
Now, working on the front of the picture, use a straight pin, toothpick or a push pin and poke holes through all the lines in the design. When you're done, you'll have what feels like Braille on the pattern side. Lay the pattern on your cake where you want the design to be and PRESTO! You've got a dot to dot design to follow on your cake. Use the picture as a guide, and a small round tip to trace the design on the cake. Let the design dry before you fill it in, so it doesn't move or the colors run, I use black (usually only takes about 1/2 a cup of frosting) to trace my designs, or a contrasting color, like dark pink for a heart design that will be white. I only use paste colors, because liquid colors thin the frosting.
Filling in the pattern:
Depending on how large or small your design is, you can fill it in using a small round tip, or a small star tip. When filling in with a round tip, I use a small, soft, paintbrush to push the frosting into the smaller areas and to the edges of the lines. Stars are faster and easier for large designs, round tips are better for smaller more intricate designs. You can use a paintbrush or toothpick to add texture, such as for fur or water or waves.
Patterns on the sides of the cake:
You can use pattern presses you can buy as a set, or make your own the same way you make the picture designs. I use a toothpick to mark where the patterns should go to make sure they are evenly placed around the sides of the cake.
Frosting recipes I use:
I use boxed cake mix, but I never use canned frosting. It doesn't hold up to decorating, because it's too thin or coloring very well. I make my frosting while my cake is cooling. The secret to this frosting is the salt makes it taste like butter cream, while using water keeps it from going bad the way milk would. It’s snow white and colors extremely well, while tasting exactly like butter cream (use 2 teaspoons vanilla in the regular recipe below, we’re substituting the cheesecake flavoring in this one). You can thicken it with powdered sugar or thin it with drops of water for whatever you need. You can also experiment with other flavors, just make sure they're clear, because they will color the frosting. These frostings are snow white and take color very well.
Selina’s “Mock” Butter Cream Frosting:
1 bag of confectioner’s sugar
2 cups of Crisco (or all vegetable shortening)
1/8 -1/4 teaspoon of salt (check for taste after mixing, using 1/8th)
2 teaspoons Vanilla
½-1 cup of water
(You can sift the sugar if you like, but normally it’s not needed with the Dixie Crystal brand.)
Add sugar to bowl, add salt (start with 1/8th teaspoon) , Crisco (cut into ½ cup sizes for easier mixing) and flavoring (start with 1 teaspoon). Add ½ cup water to start, begin mixing on low, then medium as it comes together. Add water a little at a time, until you reach the consistency needed for frosting cakes. (Less for stiffer decorating frosting)
(You can add ¼ cup of cocoa to make this chocolate, more or less to your taste. You can add brown food coloring if you want a darker “chocolate” color)
Makes enough to frost and decorate 1 quarter sheet cake (13X9”) or 1 two layer 8-9” round cakes
I use this one for Red Velvet and Carrot Cakes:
Selina’s “Mock” Cheesecake Flavor Frosting (it's also white):
1 bag of confectioner’s sugar
2 cups of Crisco (or all vegetable shortening)
1/8 -1/4 teaspoon of salt (check for taste after mixing, using 1/8th)
1 to 1½ teaspoons cheesecake flavoring (check for taster after mixing, using 1 teaspoon)
½-1 cup of water
(You can sift the sugar if you like, but normally it’s not needed with the Dixie Crystal brand.)
Add sugar to bowl, add salt (start with 1/8th teaspoon) , Crisco (cut into ½ cup sizes for easier mixing) and flavoring (start with 1 teaspoon). Add ½ cup water to start, begin mixing on low, then medium as it comes together. Add water a little at a time, until you reach the consistency needed for frosting cakes. (Less for stiffer decorating frosting)
Makes enough to frost and decorate 1 quarter sheet cake (13X9) or 1 two layer 8-9” round cakes
Don't want to spend a lot on those cake boards? Neither did I!
You can use cardboard boxes cut to fit your cake or even beer/soda flats (they come with the beer or soda six packs at the convenience or grocery store, just ask for them). Cut the sides off the beer flats and they're perfect for a 13X9" cake. Or you can lay your cake pan upside down on cardboard, trace it and cut it out. Cover with foil and tape on the bottom. It leaves enough room on the sides for side decorations on the bottom with room to spare. If you're making a larger cake, double the board, to make it sturdy and easy to transport. If you put double sided tape in the bottom of the box or whatever you're transporting your cake in, it won't slide around while you're driving.
That's all I can think of for now...if you need any other tips, or have questions, let me know...
Cake! I love cake!
I love cake so much, I learned how to decorate them so I could make all of my children's birthday cakes! I studied a lot of books, tips and techniques and then I went and took a couple of Wilton's courses. I always wanted to go to their wedding cake school! That would have been so much fun!! Lot's of money in wedding cakes!! Here's a few I've made over the years. Anyone got some pics they want to post? Post away! I'd love to see your work!


This was my official icing taster! The TravMan!
:o)


Can you crochet or knit? Show us your work!
Can your crochet or knit? Show us your work! I always wanted to learn, but never took the time to do it. My Mom crocheted like a pro! She could have sold her work for lots of money, but never would! I wish I had paid more attention or let her teach me how to crochet, but foolishly I didn't.
I recently learned a couple of basic stitches and I'm currently working on a baby blanket for my new grandbaby. I actually learned how to crochet watching videos on Youtube! LOL The first thing I made was a sweater for my little dog. I kept thinking "If I can do this, I can certainly do a baby blanket!" LOL So that's what I'm working on now. I don't have a whole lot of time, working two jobs, but it's coming along, slowly but surely!
Here's a few pictures of the doggy sweater I made. My very first attempt at crocheting. I tried my hand a knitting years ago and I did pretty well. I may try that again, too!


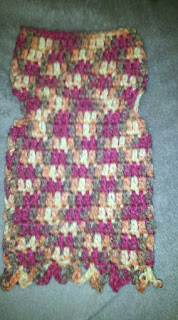
The blanket I'm doing is a continual Granny Square design. I can't wait to see how it turns out! Here's a preview:


How am I doing so far? I could really use some tips! LOL


I recently learned a couple of basic stitches and I'm currently working on a baby blanket for my new grandbaby. I actually learned how to crochet watching videos on Youtube! LOL The first thing I made was a sweater for my little dog. I kept thinking "If I can do this, I can certainly do a baby blanket!" LOL So that's what I'm working on now. I don't have a whole lot of time, working two jobs, but it's coming along, slowly but surely!
Here's a few pictures of the doggy sweater I made. My very first attempt at crocheting. I tried my hand a knitting years ago and I did pretty well. I may try that again, too!


The blanket I'm doing is a continual Granny Square design. I can't wait to see how it turns out! Here's a preview:


Here it is finshed. What do you think? :)


Our Christmas Egg Nog...
This is the recipe for the egg nog we make at Christmas time...once you try this one, you'll never go back to the old way! Yummy!!
Mocha Egg Nog
6 large eggs, lightly beaten
3/4 cup sugar
2 cups milk
1 cup kahlua (see substitute below)
1/2 cup chocolate syrup
1 tablespoon vanilla extract
2 cups heavy whipping cream
Garnishes: Ready Whip cream, chocolate sprinkles
Stir together eggs and sugar in a large saucepan; gradually stir in milk. Cook over medium heat, stirring constantly, 18 to 20 minutes or until mixture thickens and coats a metal spoon. Remove from heat; stir in Kahlua, chocolate syrup and vanilla. Cover and chill 8 hours. Beat whipping cream at high speed with an electric mixer until soft peaks form; fold into chilled egg mixture. Garnish, if desired. (you can use 2 teaspoons of instant coffee instead of Kahlua for a non-alcoholic version)
(Definitely a break from the regular, boring eggnog. We love this one!)
Happy Holidays from our house to yours!
Mocha Egg Nog
6 large eggs, lightly beaten
3/4 cup sugar
2 cups milk
1 cup kahlua (see substitute below)
1/2 cup chocolate syrup
1 tablespoon vanilla extract
2 cups heavy whipping cream
Garnishes: Ready Whip cream, chocolate sprinkles
Stir together eggs and sugar in a large saucepan; gradually stir in milk. Cook over medium heat, stirring constantly, 18 to 20 minutes or until mixture thickens and coats a metal spoon. Remove from heat; stir in Kahlua, chocolate syrup and vanilla. Cover and chill 8 hours. Beat whipping cream at high speed with an electric mixer until soft peaks form; fold into chilled egg mixture. Garnish, if desired. (you can use 2 teaspoons of instant coffee instead of Kahlua for a non-alcoholic version)
(Definitely a break from the regular, boring eggnog. We love this one!)
Happy Holidays from our house to yours!
Turtle Pumpkin Cheesecake, a Holiday favorite!
This is a recipe we ran across a few years ago. We've made it and served it every Thanksgiving since! It is easy and tastes amazing!
Turtle Cheesecake

This was before being moved to a nice plate for serving!
Turtle Cheesecake
| 2‑1/2 | cups crushed chocolate cookies or vanilla wafers |
| 1/4 | cup (1/2 stick) butter, melted |
| 2 | packages (8 ounces each) cream cheese, softened |
| 1 | cup sugar |
| 1‑1/2 | tablespoons all-purpose flour |
| 1‑1/2 | teaspoons vanilla |
| 1/4 | teaspoon salt |
| 3 | eggs |
| 2 | tablespoons whipping cream |
| Caramel Topping | |
| Chocolate Topping | |
| 1 | cup chopped toasted pecans |
PREPARATION:
- Preheat oven to 450°F.
- Combine cookie crumbs and butter in medium bowl; press onto bottom of 9-inch springform pan.
- Beat cream cheese in large bowl until creamy. Add sugar, flour, vanilla and salt; mix well. Add eggs, one at a time, beating well after each addition. Blend in cream. Pour over crust. Bake 10 minutes.
- Reduce oven temperature to 200°F. Bake 35 to 40 minutes more or until set. Loosen cake from rim of pan; cool. Remove rim of pan.
- Prepare Caramel Topping and Chocolate Topping. Drizzle over cheesecake. Refrigerate cheesecake. Sprinkle with pecans just before serving.
Caramel Topping
Combine 7 ounces (1/2 bag) caramels and 1/3 cup whipping cream in small saucepan; stir over low heat until smooth.
Chocolate Topping
Combine 4 squares (1 ounce each) semisweet chocolate, 1 teaspoon butter and 3 tablespoons whipping cream in small saucepan; stir over low heat until smooth.

This was before being moved to a nice plate for serving!
Subscribe to:
Posts (Atom)